
Stylist Guide › Section 6: Styling Logic & Emotional Design › Rule #170
How do you know a room is ready before the photographer arrives?
The rule in one minute. Every room should pass the photo test before it's shown: photograph it on your phone from the doorway and the far corner, and judge the photo, not the room. A room passes when the photo has one clear focal point, even light, straight lines, visible floor in about a third of the frame and clean edges. Anything that fails in the photo will fail in the listing, so fix it while it takes two minutes, not after the photos are live.
Your questions, our answers
Sellers ask us about the photo test more than almost anything else, because it's the moment the house stops being a home and becomes a listing. These are the questions we hear most, with the answers we give.
"What exactly is the photo test?"
"Isn't it just tidying up?"
No. Tidying is about the room; the photo test is about the picture. A room can be perfectly tidy and still photograph badly: a dark corner, a sofa back to the camera, a bin at the edge of the frame, a ceiling fan cutting the window in half. The photo test catches what tidying misses, because it uses the same tool the buyer will: a flat image on a small screen.
What is the photo test in home staging?
It's a two-minute check of every room through a phone camera: take one landscape photo from the doorway and one from the far corner, at chest height, then check the photos for a focal point, light, straight lines, visible floor and clean edges. If a photo fails any of the five, fix the room and photograph it again.
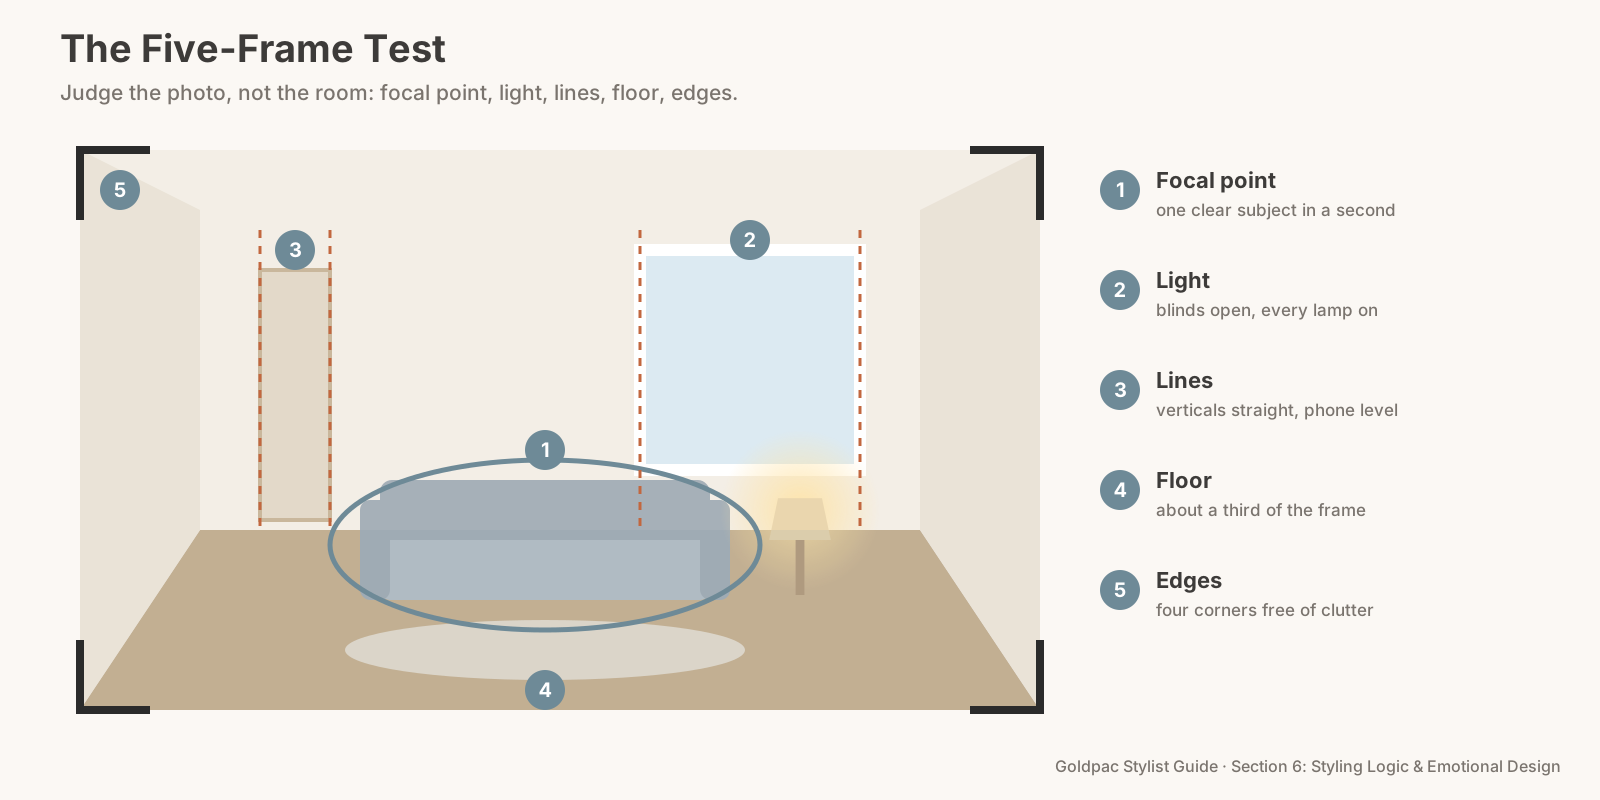
The Five-Frame Test
"What am I actually looking for?"
Five things, in this order.
- Focal point. Can you name the subject of the photo in one second? A made bed, a dining table, a sofa facing you, a window. If your eye wanders, there are too many things competing (Rule #160 covers making one spot the hero).
- Light. Is the brightness even across the frame? Open every blind and curtain, turn on every lamp and ceiling light, and check that no corner is dark and no window is a white blowout with nothing visible through it.
- Lines. Are the walls, door frames and window edges vertical in the photo? Hold the phone level, at about chest height, so the room doesn't lean. Leaning lines make a room feel off even when buyers can't say why.
- Floor. Can you see floor in roughly a third of the photo? Visible floor is how buyers judge size. If rugs, furniture and objects cover it, the room reads as smaller.
- Edges. Check the four edges and corners of the frame. That's where cables, bins, power boards, laundry, shoes and the corner of the fridge hide.
The Five-Frame Test: two phone photos per room, from the doorway and the far corner, checked for one focal point, even light, straight lines, floor in about a third of the frame and clean edges, in about two minutes a room.
"Why from two positions?"
Because the photographer will use at least two. The doorway shows the room as a buyer enters it (Rule #167 covers the doorway view). The far corner shows the depth of the room and usually takes in a window or a second wall. A room that looks good from one position and cluttered from the other isn't finished.
The far corner shot catches the things you've hidden from the door. Sellers are often good at the doorway view because they see it every day. The view back toward the door is where the shoe pile, the coat hook and the laundry basket tend to live.
The phone-camera test, step by step
Put your phone in landscape. Use the standard 1x lens for most rooms, or 0.5 for small bedrooms and bathrooms, because that's what many photographers do. Stand one step inside the doorway, hold the phone at chest height and level, and take one photo. Walk to the far corner and take a second. Then sit down and look at both on your screen, not at the room. Zoom in on the corners. Every object you didn't notice in the room is the one buyers will notice in the listing.
"Which rooms need it most?"
The rooms in the first few photos of the listing. The order varies, but it usually starts with the front of the home, the main living area and the kitchen. Those rooms do the most work in the listing, so test them first and fix them first (Rule #306 covers styling the rooms in the first five photos first).
Then every room that will be photographed. If a room fails the test and can't be fixed, tell your agent, so the photographer can choose the angle carefully or leave it out of the main gallery.
"What do I say to the agent and the photographer?"
Script: before photo day "We've run a photo test on every room. The living room and the main bedroom photograph best from the far corners. The study still has a dark corner, so please take it with the lamp on. The second bathroom is small, so a wide lens shot from the door works best. Is there anything you'd like moved before you arrive?"
It saves time on the day and makes the photographer your ally. Most photographers are glad to know which angles work; they're working fast and every tip helps.
Why a photo is harsher than a visit
Photos flatten a room into composition. In real life, depth, sound, smell and movement fill a room. In a photo there are only shapes, light and colour on a rectangle. Clutter that disappears in real life (because your eye skips it) takes up space in a photo, because a camera gives every object equal weight. That's why rooms that feel fine can photograph badly, and why the only reliable test is a photo.
The blind spot: you trust your eyes
You've seen the room thousands of times, and your brain fills in the gaps. The cable becomes invisible; the dark corner looks fine because you know what's there; the leaning lamp shade doesn't register.
The phone has no memory of the room, and neither does a buyer. Trust the photo over your eyes every time.
What if…
The room fails because of something you can't change, like a dark room with one small window or an awkward column. Fix what you can: every light on, the brightest bulbs the fittings allow, and a light-coloured throw or rug to bounce light. Then tell the photographer which angle hides the problem best.
You're living there with kids and pets. Run the test once fully, a week before the photos, and fix the big things then. On photo day, run it again in five minutes per room for the daily clutter only.
FAQ
How do I check if my room is ready for listing photos? Take two photos on your phone, from the doorway and from the far corner, then check them for one focal point, even light, straight lines, visible floor and clean edges.
Should all the lights be on for real estate photos? Usually yes: every lamp and ceiling light on, all blinds open, with matched bulbs so the light colour is even.
What height should I hold my phone to test a room? About chest height, held level, in landscape. That's close to how most interior photos are taken.
The photo test turns your home into the listing before the photographer does. For empty homes and agent listings, Goldpac stages every room to pass it, with our own furniture: send us the address and a fixed styling quote lands within two hours, through our home staging page. Living there? A Photo Ready Consultation runs the test room by room with you and leaves a written plan within 48 hours of the visit. See current prices.
Keep reading: Rule #306: Style the rooms in the first five photos first (the first five photos) · Rule #167: Make every doorway view photogenic (photogenic doorway views)
◀ Previous: Rule #169: Stage balconies as usable outdoor rooms · Section 6 contents · Next: Rule #171: Create rhythm with repetition and variation ▶
Part of the Goldpac Stylist Guide: 300+ home staging rules from Goldpac's Sydney styling team.